Monday 31 December 2012


Sunday 30 December 2012
Free Printable 2013 Calendars - My Two Picks!
With the New Year looming, I've been searching the Internet for a couple of free printable 2013 calendars to share. The first is from artist Amy Kirkpatrick, Amy is a professional watercolour artist living in San Diego, California who has designed a delightful calendar with a cross range of her watercolour images. Amy is kindly offering her calendar free to download.

Visit Amy Kirkpatrick Fine Art to download this pretty calendar. You could also visit Amy's Etsy Shop
where her fine art prints and digital craft sheets are available to purchase. NOTE: The first link is for the free calendar.
The second calendar is a simple black and white image of the Eiffel Tower which I thought would suit most decor styles. This vintage style calendar was designed by "Call Me Victorian", where you can find lots of free printables.

Personally I have downloaded both, Amy's for my studio and the Eiffel Tower for my kitchen.
Hope you have a wonderful New Years Eve
I will be sharing this post with:

Friday 28 December 2012
New Years Eve Inspiration
Where does time go? Christmas day came and went, and I've suddenly realised its only a few days until New Years eve. I made a quick, but fruitful dash around the Internet today to gather some inspiration for your New Years Eve party. Decor, food and even some free printable's to download.


Decor Idea - source via
Image via
Image via
You can't have a New Years eve without Champagne - Champagne & pomegranate punch - from Wedding TV

Add sprigs of lavender to your champagne glasses for a pretty effect. Photography by Jihan Cerda Photography image via Style Me Pretty

Copy this simple drinks bar idea via Loveliest Day on Tumblr. Great inspiration for the patio or deck if your having a Summer New Years Eve. If it's snowing outside then perfect for a barn party.

spray paint some plastic animals from the $2 shop to create some up cycled swizzle sticks by drilling a small hole and gluing onto a wooden skewer - image via, (I would advise using non toxic paint)

Impress your guests with this Fig, Ginger Syrup & Crushed Pistachio Pavlova - Recipe at Almost Bourdain a fabulous Australian food blog

Make these fun and colourful edible chocolate gems - find out how at PS I Made This
Hope you found some inspiration for your New Years Eve
Sharing this post with:

Tuesday 25 December 2012
Merry Xmas - Welcome to My Home


Oh and Poppy wants to wish all my readers a very Merry Xmas and a Happy New Year. I'll be having a break for a few days but will be back later this week. You can still catch up with snippets on my Face Book page.

Saturday 22 December 2012
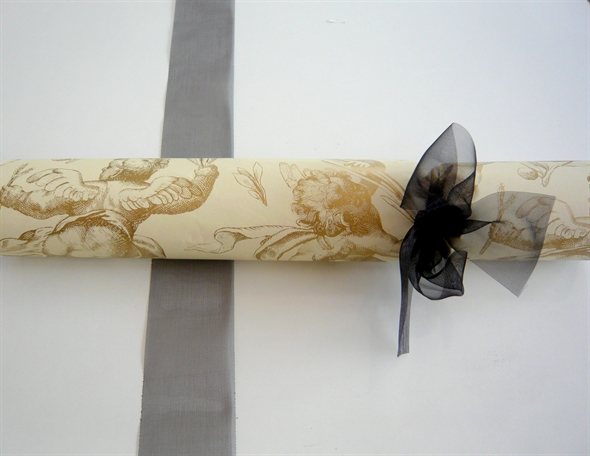
Christmas Crackers - Re-inventing cheap crackers to luxurious ones
Each Christmas I make my own Christmas crackers/bon bons, this year, however, I was fast running out of time so decided to re-invent some cheap ones from the $2 shop.

What you will need:


- Cheap Christmas crackers (I got 6 for $2 total)
- 1 sheet of wrapping paper of your own choice (I chose cream with gold cherubs) (1 metre sheet does 6 crackers easily).
- Scissors
- Narrow double sided tape
- Ribbon of your choice (I used some black organza)
- Embellishments (ideas here), this year I used old broken vintage jewellery and some faux pearls.
- Hot glue gun if using embellishments.
- Token fillings such as chocolates (Hershey's kisses are good en mass, or they hold around 3 Ferrero Rocher chocolates). Little key rings, earrings, pens whatever you can find that will fit in. Usually they contain a folded paper hat, joke and token gift. Often you can find little things in the $2 shop at the same time.
1. Snip off the original ties and open the cracker to empty the contents if you are replacing with your own little tokens or chocolates. I prefer to use my own contents.
2. Cut your paper to fit you want it to go around the cylnder but overlap around 3/4" as when you pull it in with ribbon it will shrink slightly and you want the outer paper slightly longer or the same as the inner card.
3. Place a strip of double sided tape along one side about 1" from each end
4. Roll the paper around the cylnder allowing it to stick to the double sided tape
5. Cut two pieces of ribbon per cracker to tie at each end, allow enough to tie a decent little bow
6. Place the ribbon exactly where the original cracker has its indent and tie tightly, turn the cracker over to make sure the ribbon is pulled in tightly all the way around. Then tie your bow and snip off the excess.
7. Repeat at the other end.
8. Add your embellishment - I added another strip of ribbon which I hot glued in place (be careful with gauzy ribbon). I then glued a single large pearl on the top for a simple look.
How pretty they look on a plate.
If you want to know how to make crackers from start to finish without using existing ones, I made some lovely purple ones last year, DIY instructions can be found "here".
Have fun!
Sharing this post with:
Friday 21 December 2012
Christmas Mince Pies - Quick & Easy Bite Size Version Of These Sweet Treats
English mince pies (the Christmas ones) have had a long tradition in New Zealand as well as England and, I'm hoping now to persuade my worldwide audience to give them a try, I'm sure you will love them and hopefully make it part of your Christmas tradition.
My mince pies are mini bite size versions and I'm totally cheating today by using some store bought frozen pre-rolled pastry and of course some ready made fruit mince. I am not sure if it's available in the USA, if not, there is a great recipe for fruit mince at Delia On Line but it is so much easier to buy and it's a "rare" cook that doesn't use the store bought mince (Delia exempt of course). I did find jars of my favourite, Robertson's Classic Mincemeat to purchase on line.
My guests this year are going to have a little parcel of these tarts on the Christmas dinner table. My two sons love them and usually I'm having to top up the platter every few minutes. I normally make around 4 dozen to have on hand when guests pop in. In fact, I have actually made 4 dozen this past week and with sons passing through and drinks at neighbours, they have already disappeared!
I've put together some step by step photos for you and a simple recipe using store bought ingredients:


- 1 jar of Fruit Mince, I like Robertson's Classic Mincemeat
- 1 packet of frozen short crust pastry (or sweet crust Pastry) of make your own shortcrust pastry
- Icing sugar for dusting.
- Mini muffin tins 2" diameter and 3/4" deep approximately (5cm diameter x 2 3/4cm deep) These are like mini muffin pans and usually come with 12 in each.
- Star cutter 1 1/4 " or 3cm from point to point.
- Round fluted cutter 2 1/4 " or 6cm.
Method:
- Roll your pastry to the desired thickness, thin enough so that they crisp but not so thin they will break when placing the pastry circles into the tins or removing them.
- Lightly grease your patty tins with margarine, not butter.
- Using the round cutter, cut enough circles to fill each tin ( 1 jar of fruit mince usually makes about 3-4 dozen of these bite size tarts.(well two bites to be precise).
- Place your circles down into the mini muffin pans, press gently.
- Place about 1 teaspoonful of the fruit mincemeat mixture into each tart, you want them to be about 3/4 full. Do not fill too much or they will overflow and it will make it harder to remove them from their tins.
- Roll out some more pastry and cut your stars out. I like the pastry to be a little bit thicker so the stars sit nicely on the top.
- Place your stars in the centre of each filled tart, just let them sit there, do not push it down as you don't want to get the fruit mince to spill onto the stars (perfectionist that I am).
- Brush the top of the pastry stars with a little milk (not essential but helps to give it a golden colour)
- Bake at 180-200 degrees (approx 375 Fahrenheit) (or recommended temperature on pastry packet) for approximately 10 mins until the pastry is golden. (check after 10 mins to see if golden, if not cook a little longer).
- Remove from oven, allow to cool in their tins then remove tarts.
- Place tarts on a work surface and dust the tops with icing sugar lightly (make sure they are cooled down)
- You can then move them onto your platter or wrap with cellophane and tie with ribbon or alternatively place in little boxes as gifts.
Chefs Tips:
Make a double batch and freeze them.
You can also make the pies in slightly larger pans and serve them warm, fresh from the oven with cream or vanilla ice cream as a desert...Yum, Yum!
You can also make the pies in slightly larger pans and serve them warm, fresh from the oven with cream or vanilla ice cream as a desert...Yum, Yum!


Sharing this post with :

Subscribe to:
Posts (Atom)