

Showing posts with label Christmas. Show all posts
Showing posts with label Christmas. Show all posts
Saturday, 15 December 2018
A Festive Home of Swags and Wreaths


Thursday, 22 December 2016
A Christmas House Tour

I love to peek inside the homes of other bloggers, especially when they are decked out for the holidays, these talented people may not be trained interior designers, however, they are just as creative. Blogger Susan from Saw Nail & Paint has the most delightful cottage style house beautifully decked out for the holiday season.
Tuesday, 13 December 2016
Are you Looking for Christmas Decorating Ideas - Traditional and Modern Mix
Wednesday, 16 December 2015
Be Inspired - Christmas Tablescapes
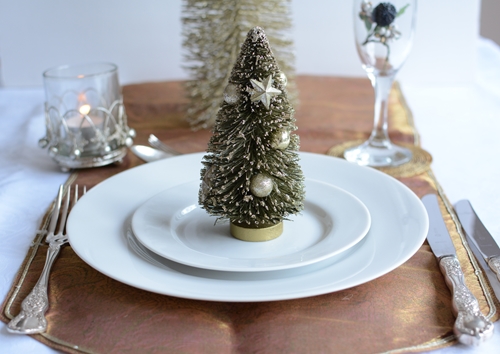
1. I bought this wee tree for my mantel but thought it would look nice on the table too
Have you thought about dressing your table this Christmas but not sure where to start, I thought I would share a few of my own ideas and more inspiration from around the web.
Tuesday, 8 December 2015

Monday, 22 December 2014
Christmas Table Decoration - Be Inspired

1.
Sunday, 21 December 2014
Gluten, Dairy and Sugar Free Christmas Fruit Cake

Originally a recipe from a friend, 'Kathy's Real Easy Fruit Cake' is a simple to make cake that is a great Christmas cake option. Being intolerant to gluten I made the cake this weekend as a GF version.
Wednesday, 17 December 2014
A Mix Of Holiday Inspiration - DIY Decor, Free Printables and More

As a Blogger one's mind is torn in all directions at the inspirational DIY ideas on the web. Today I want to share some holiday diy inspiration and some free printables. I have placed links to the tutorials or downloads beneath the images.
Tuesday, 9 December 2014
DIY Snow Globes - 7 Simple Ideas

As a child I have fond memories of pretty snow globes my mother used to buy me at Christmas, today's snow globes seem to be made from cheap plastic and don't have quite the same charm, however, I spotted some lovely DIY snow globes around the blogasphere created with mason jars and ornaments. These ideas are simple to create and so much prettier than store bought globes. I decided to share some of the prettiest ones I discovered and also have a go myself.
Monday, 8 December 2014
Welcome To My Home - A Peek At My Holiday Decor

This weekend I began decorating my cottage this years theme would be 'natural', possibly I went a wee bit overboard with my mantelpiece, hopefully it will survive until Boxing day.
Friday, 28 November 2014
Real Foliage For The Holidays - Small Tree Decorating Ideas

1
My eight foot Christmas Heirloom tree has been wrapped and stored under my deck the past three years. The first year I managed to find room for it, that was until my Korean cabinet arrived and took up the only space my tree could go. Since then I have had to make do with small, faux trees dotted around the house, this year I have decided to use some small, 'natural' trees as well as faux and have been looking around for some inspiration.Wednesday, 25 December 2013
Merry Christmas & A Couple of Shots With My Brand New Camera
Christmas day has finally reached NZ (1 more day for my USA readers), Poppy and I want to wish our readers, sponsors and advertisers a very Merry Christmas and thank you so much for all your support this year. It's been a very busy run up to Christmas day which will be spent with family and friends. If you are a regular reader you will have heard me mention a few, many times about upgrading my little point and shoot to a DSLR, well the day has finally arrived. It has been two years in the waiting, but now I have my Nikon D7100 in my hot little hand. I have to add, with such an advanced camera, as a complete beginner I will not be able to achieve exactly the shots I am after until I have attended a camera course. I haven't bought my 35mm lens so meanwhile shooting with the lens that came with the kit. I have been rather frustrated with trying to work out how to achieve the shots I want so will probably be spending some time on Youtube meanwhile.
Have a wonderful Christmas everyone, wherever you are in the world, I will leave you with my first two shots of dear wee Poppy who has the patience of a saint when it comes to having her photograph taken.
Have a wonderful Christmas everyone, wherever you are in the world, I will leave you with my first two shots of dear wee Poppy who has the patience of a saint when it comes to having her photograph taken.


I wish everyone a safe holiday and will see you again in a few days time, hopefully I will have mastered a few camera skills via Youtube and share a few images of my home.
Lee & Poppy oxo

Saturday, 14 December 2013
Iced Gingerbread Cookies - Simple Recipe & Icing Tutorial
I am trying to cram in as many Christmas posts as I can with time desperately running out. It is 10.30pm and I have just finished icing my gingerbread cookies, I would certainly not win an award for my attempt but having discovered a fabulous video tutorial, which has revolutionised my skills, I am quite proud of my results. No longer do I need to mess around with different sized nozzles and plastic piping bags creating a sticky mess. This easy icing bag and nozzle is made out of a single piece of baking paper. I am sure seasoned icers already use this method, however if you are new to this skill, you will find the video invaluable. I have embedded the video at the end of this post.


Ginger Bread Cookies (makes 17 medium to large cookies)
Double the recipe for larger amounts.
Ingredients:
125g butter
3 and a half tablespoons of golden syrup
100g Muscovado sugar
300g plain flour
2 tsp ground ginger
1 tsp baking soda
large flat baking sheet
Icing:
1 packet of Royal icing powder mix (white)
Instructions:
- Melt your butter, sugar and golden syrup together in a pot
- Heat oven to 200 degrees Celsius (392 Fahrenheit)
- Sift flour, ginger and baking powder
- Add melted mixture to dry ingredients
- Stir well until it forms a stiff ball (if too sticky, add some more flour)
- Roll out the dough to a thickness of around 1cm directly onto the baking sheet
- cut out your shapes, retain the excess dough to make a second batch
- leave an allowance between cookies so they do not spread into each other
- Make a hole near the top with a skewer or similar, make it a little larger than you will need as the cookie dough may spread slightly
- Bake for 10-12 minutes
- Remove from oven, should be slightly browner at the edges. Allow to cool then remove to cool further on a cookie rack
- When cookies are completely cooled down, mix your icing by directions on packet (see video for texture and recipe if required)
- Make your icing bag by folding a piece of baking paper as per video, make sure you roll the paper into a fine point, achieving a fine hole for piping (around 2mm)
- Cut off excess paper at the top and spoon your icing inside (make sure it is well into the lower half of the bag). Fold across the top as per video to form a seal and help push the icing down
- Pipe your cookies and allow them to dry before threading some twine or ribbon for hanging on a tree


Hints & Tips:
- If the mixture sticks to the rolling pin you can place a sheet of baking paper over the top and roll on top of this. I actually just added a little more flour to the mixture.
- This mixture can be used to make a gingerbread house but you will need to double the mixture
- Do not place uncooked cookies too close to each other as they can spread a little
- Adding silver balls to the icing can create a pretty look
- Squeeze slowly and steadily when icing, constant pressure is important in neat piping
- These cookies make great hostess gifts if you wrap them in cellophane and tie with a pretty ribbon (black & white gingham looks great)
If you want to make some more Holiday candy's you may enjoy this easy tutorial for
Enjoy
Lee oxo
Sharing this post with the following link parties;
Wednesday, 4 December 2013
Decorating For The Holidays - Simple but classy
Seeking ideas to decorate your home for the holidays, keeping it simple can look classy and this year I am going fairly minimal with my own decorations, preferring a simple white theme with a little green, I love these ideas below...


Coming up over the next couple of weeks I will be sharing lots of holiday inspiration, yummy recipes, tablescapes, trees and some Christmas DIY ideas. If you can't wait, you can find a few ideas from last year on my side bar under 'Holiday Inspiration', upcycled Christmas crackers, easy Christmas cake recipe, rocky road bark, which is always a hit, plus more.
Lee x
Tuesday, 25 December 2012
Merry Xmas - Welcome to My Home


Oh and Poppy wants to wish all my readers a very Merry Xmas and a Happy New Year. I'll be having a break for a few days but will be back later this week. You can still catch up with snippets on my Face Book page.


Friday, 21 December 2012
Christmas Mince Pies - Quick & Easy Bite Size Version Of These Sweet Treats
English mince pies (the Christmas ones) have had a long tradition in New Zealand as well as England and, I'm hoping now to persuade my worldwide audience to give them a try, I'm sure you will love them and hopefully make it part of your Christmas tradition.
My mince pies are mini bite size versions and I'm totally cheating today by using some store bought frozen pre-rolled pastry and of course some ready made fruit mince. I am not sure if it's available in the USA, if not, there is a great recipe for fruit mince at Delia On Line but it is so much easier to buy and it's a "rare" cook that doesn't use the store bought mince (Delia exempt of course). I did find jars of my favourite, Robertson's Classic Mincemeat to purchase on line.
My guests this year are going to have a little parcel of these tarts on the Christmas dinner table. My two sons love them and usually I'm having to top up the platter every few minutes. I normally make around 4 dozen to have on hand when guests pop in. In fact, I have actually made 4 dozen this past week and with sons passing through and drinks at neighbours, they have already disappeared!
I've put together some step by step photos for you and a simple recipe using store bought ingredients:
to purchase on line.My guests this year are going to have a little parcel of these tarts on the Christmas dinner table. My two sons love them and usually I'm having to top up the platter every few minutes. I normally make around 4 dozen to have on hand when guests pop in. In fact, I have actually made 4 dozen this past week and with sons passing through and drinks at neighbours, they have already disappeared!
I've put together some step by step photos for you and a simple recipe using store bought ingredients:


- 1 jar of Fruit Mince, I like Robertson's Classic Mincemeat
- 1 packet of frozen short crust pastry (or sweet crust Pastry) of make your own shortcrust pastry
- Icing sugar for dusting.
- Mini muffin tins 2" diameter and 3/4" deep approximately (5cm diameter x 2 3/4cm deep) These are like mini muffin pans and usually come with 12 in each.
- Star cutter 1 1/4 " or 3cm from point to point.
- Round fluted cutter 2 1/4 " or 6cm.
Method:
- Roll your pastry to the desired thickness, thin enough so that they crisp but not so thin they will break when placing the pastry circles into the tins or removing them.
- Lightly grease your patty tins with margarine, not butter.
- Using the round cutter, cut enough circles to fill each tin ( 1 jar of fruit mince usually makes about 3-4 dozen of these bite size tarts.(well two bites to be precise).
- Place your circles down into the mini muffin pans, press gently.
- Place about 1 teaspoonful of the fruit mincemeat mixture into each tart, you want them to be about 3/4 full. Do not fill too much or they will overflow and it will make it harder to remove them from their tins.
- Roll out some more pastry and cut your stars out. I like the pastry to be a little bit thicker so the stars sit nicely on the top.
- Place your stars in the centre of each filled tart, just let them sit there, do not push it down as you don't want to get the fruit mince to spill onto the stars (perfectionist that I am).
- Brush the top of the pastry stars with a little milk (not essential but helps to give it a golden colour)
- Bake at 180-200 degrees (approx 375 Fahrenheit) (or recommended temperature on pastry packet) for approximately 10 mins until the pastry is golden. (check after 10 mins to see if golden, if not cook a little longer).
- Remove from oven, allow to cool in their tins then remove tarts.
- Place tarts on a work surface and dust the tops with icing sugar lightly (make sure they are cooled down)
- You can then move them onto your platter or wrap with cellophane and tie with ribbon or alternatively place in little boxes as gifts.
Chefs Tips:
Make a double batch and freeze them.
You can also make the pies in slightly larger pans and serve them warm, fresh from the oven with cream or vanilla ice cream as a desert...Yum, Yum!
You can also make the pies in slightly larger pans and serve them warm, fresh from the oven with cream or vanilla ice cream as a desert...Yum, Yum!


Sharing this post with :

Wednesday, 19 December 2012
Christmas Tablescape - French Style With A Touch Of Silver
The other week I was wandering around Le Monde, one of my favourite Auckland homeware stores. First I was awed by a gorgeous room setting with accents of a deep, lime green, then I spotted their beautiful Christmas tablescapes. Le Monde is one of those stores you can't resist walking into, displayed cleverly into room settings, but never cluttered, I'm always inspired by the ever changing colours and designs. A few weeks ago I was inspired by their blue and white setting and dashed home to bring more blue and white into my sitting room. Today I feel inspired by another of their beautiful settings with accents of lime green and seriously thinking about introducing touches of this colour into my living area next Winter.
While I was browsing, I spotted two gorgeous Christmas tablescapes which Le Monde kindly let me photograph. Today I'm sharing a silver tablescape, with a French feel, and tomorrow, one a little more rustic, I hope they inspire your own table this Christmas. If you live in Auckland and you haven't visited Le Monde, I encourage you to visit this beautiful shop. oh! and its right next to La Cigale French Market, so makes a great Saturday morning shopping and eating ☺


Hope you've been inspired, please come back tomorrow as I will be sharing Le Monde's gorgeous rustic table setting, sneak peek below.

Sharing this post with:

Disclaimer:
This is not a sponsored post, these are my own thoughts and images. Photography by Lee Caroline - A World Of Inspiration
This is not a sponsored post, these are my own thoughts and images. Photography by Lee Caroline - A World Of Inspiration
Subscribe to:
Posts (Atom)