
Each Christmas I make my own Christmas crackers/bon bons, this year, however, I was fast running out of time so decided to re-invent some cheap ones from the $2 shop.

What you will need:


- Cheap Christmas crackers (I got 6 for $2 total)
- 1 sheet of wrapping paper of your own choice (I chose cream with gold cherubs) (1 metre sheet does 6 crackers easily).
- Scissors
- Narrow double sided tape
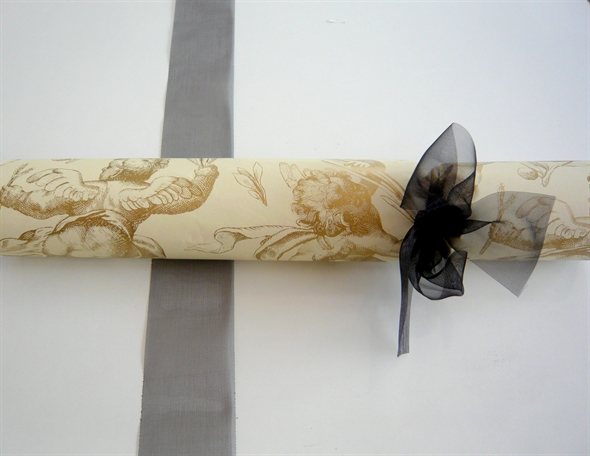
- Ribbon of your choice (I used some black organza)
- Embellishments (ideas here), this year I used old broken vintage jewellery and some faux pearls.
- Hot glue gun if using embellishments.
- Token fillings such as chocolates (Hershey's kisses are good en mass, or they hold around 3 Ferrero Rocher chocolates). Little key rings, earrings, pens whatever you can find that will fit in. Usually they contain a folded paper hat, joke and token gift. Often you can find little things in the $2 shop at the same time.
1. Snip off the original ties and open the cracker to empty the contents if you are replacing with your own little tokens or chocolates. I prefer to use my own contents.
2. Cut your paper to fit you want it to go around the cylnder but overlap around 3/4" as when you pull it in with ribbon it will shrink slightly and you want the outer paper slightly longer or the same as the inner card.
3. Place a strip of double sided tape along one side about 1" from each end
4. Roll the paper around the cylnder allowing it to stick to the double sided tape
5. Cut two pieces of ribbon per cracker to tie at each end, allow enough to tie a decent little bow
6. Place the ribbon exactly where the original cracker has its indent and tie tightly, turn the cracker over to make sure the ribbon is pulled in tightly all the way around. Then tie your bow and snip off the excess.
7. Repeat at the other end.
8. Add your embellishment - I added another strip of ribbon which I hot glued in place (be careful with gauzy ribbon). I then glued a single large pearl on the top for a simple look.
How pretty they look on a plate.
If you want to know how to make crackers from start to finish without using existing ones, I made some lovely purple ones last year, DIY instructions can be found "here".
Have fun!
Sharing this post with:
They're beautiful!
ReplyDeleteThank you Gina, a quick makeover this year.
DeleteLee :)
Thanks for all the pictures and tutorials.
ReplyDeleteFrom Spain I wish you Merry Christmas.
A kiss.
Thank you Manualidades, and a very Merry Christmas from New Zealand to Spain :)
DeleteLee
I am sorry but this article is misleading.
ReplyDeleteThe subject reads : “upcycled Christmas crackers” which to me implies that they have been used once before, am i right? Which from what i could read, isn’t the case. You are making them from scratch.
I am not saying that making your own isn’t great, it does require creativity and being smart but the purpose of upcycling materials ( as opposed to buying new stuff- even cheap stuff) is to find a second life to something you already have/own, which is kind of challenging to do.
Definition of upcycle: reuse (discarded objects or material) in such a way as to create a product of higher quality or value than the original.
Thank you for your comment,
Deleteyour definition of upcycle above however does indicate the changes I made to the Christmas crackers..."to create a product of higher quality than the original" which was exactly what I did by taking an item and changing it to enhance it so that it would become more attractive and better quality than the original. However as the product I upcycled was not 'pre-used', I have changed the title of my post and removed the word upcycle as it is not meant to mislead in any way :).