
Traditional Christmas crackers can be found on most tables Christmas day in the UK and other Commonwealth countries such as Australia and NZ. The traditional cracker contains a small chemical "banger" which when the cracker is pulled, they snap and "bang" (usually frightening dogs and small children). The contents then spill out of the broken ends and usually consist of a cheesy sort of joke (typed on paper), a paper hat which you place on your head but is usually so flimsy that you continually have to straighten it or pick it up off the table after every mouthful of Turkey, and a little token gift such as a tiny plastic magnifying glass, miniature pen, or a novelty plastic toy, more expensive crackers contain more expensive gifts.
I've been making my own crackers for 10 years, each year a different theme. I've made them from brown wrapping paper with shell embellishments and hessian/hemp bows, gold wired organza ribbon and gold paper with a cherub embellishment and so on... you name it I have made it. In fact it became such a tradition that I would have my girlfriends around a few weeks before Christmas and we would have a glass of wine and share the joys of making them together. This year sadly I have not had the time to do this and am making them on my own but promising myself that next year I will be far more organised.
I've done away with the noisy bangs inside and made some pretty crackers to share with you. They are, easy and quick to make, the longest time is deciding on your theme and searching your papers, ribbons and embellishments and what to put inside, but that's also the fun part.
So without further ado, instructions below...


WHAT YOU WILL NEED:
1. Wrapping paper (I used a pretty silver Christmas paper (below) but any paper can be used depending on your table theme). I used brown paper one year with shells and hemp ribbon.
2. Coloured Cellophane for over or underlay (not essential). I chose a blue/Mauve colour to use over the top of the silver paper on some of the crackers and underneath the silver paper on others.
3. Embellishments which can be almost anything, flowers, beads, stones, shells, ribbon, bows, your limited only by your imagination. See "here" for some ideas from my Christmas gift wrapping post.
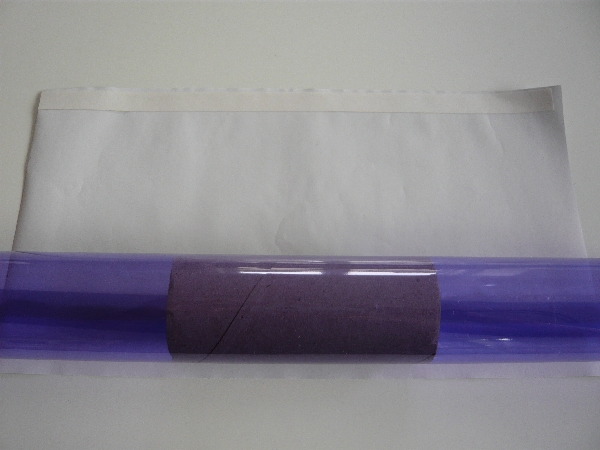
4. Cardboard cylinders (I collect them during the year from kitchen wrap rolls or toilet rolls) They need to be at least 1 3/4" or (4.5cm) in diameter and the length must be approximately 4" (10cm), no less than this.
5. Ribbon for tying around each end. Allow 2 pieces of ribbon per cracker of 24" or 60cm long each piece. This enables easy tying of the bow and you can trim a tiny bit off the ends.
6. Transparent Double sided tape.
7.Craft knife and craft board for cutting on. Scissors can be used if you don't have a craft knife.
8. Gifts to go inside, I bought some items from the $2 shop such as sparkly nail polish for girls, highlight pens, key rings, pencil sharpeners for boys, or you can fill with lots of chocolates or sweets. I don't use the traditional snaps that go "Bang!" my crackers are usually hostess gifts filled with chocolates or to decorate the table with surprise gifts inside and are" untied" rather than "pulled".

METHOD:
1. If using two layers of paper with the clear cellophane being your top layer you need to measure out and cut each piece of paper (1 per cracker) 14" (36cm in length and 6" (15cm) in depth.

2. Then measure and cut your decorative paper to go over or under the cellophane (note you do not have to use cellophane, it is easier making your first cracker to use just one piece of paper and omit the cellophane).
With two layers I cut the silver paper 10" (25cm) in length and the same width as the cellophane. It will be roughly 4" shorter than your cellophane.

3. Cut a piece of double sided tape the length of the cellophane and carefully stick the length of the edge of one side of cellophane, smoothing it down. (do not peel off yet).

4. Lay your cardboard cylinder in the centre of the cellophane, equal distance each end

5. Carefully roll your paper/cellophane peeling off the other side of the double sided tape just before you get to it as your rolling. Carefully allow it to stick to the paper without wrinkling.
6. If your creating two layers repeat with another piece of paper 4" shorter in length than the cellophane. Make sure the cylinder is again in the centre of the piece of paper. Peel off your tape and roll to create the look below...


7. Cut your ribbon/ribbons to length. I used double ribbon, a mauve piece and silver with Merry Christmas printed on it. Length approximately 24" (60cm) each. (Single piece is sufficient if you do not want double).
Note: Wired ribbon can be used but it does make it harder to straighten and neaten the cracker ends.

8. Tie one end of your cracker pulling it tight but carefully at the same time, before you tie the bow, slip your fingers down inside the end and gently push the ribbon end into the inside of the cracker to neaten it, then tease out the crinkles with your fingers gently. (see look below)


10. Place your gifts inside (I put some sparkly nail polish from $2 shop and some chocolate coins. Then repeat the step above to the other end of your cracker to close it.

12. Glue on your embellishments (if required) I used some crystal stones from $2 shop and a vintage earring that had long lost its partner. I glued these on with a hot glue gun. you could use some double sided tape if you don't own a glue gun.

The crackers look gorgeous on a Christmas table but also can be used as a hostess gift and filled with chocolates or individually wrapped home made truffles.
Quick tip: 1 mini packet of 3 Ferrero Rocher chocolates fit perfect into each cracker
I'm thinking William and Kate probably don't have time to make theirs and might have some of these on their table this year.....

Available from Harrods on line
Its really late and my eyes are seeing double, this post has taken me forever, but I have to press the Publish button now before I nod off my chair! I hope I have made this tutorial easy to follow. If you have any questions you can always email me at:
leecarolineart@gmail.com
Lee oxo
&
Poppy

Wow! These are impressive. Love the idea of making our own. Thank you the tutorial. Your designs are lovely. I am your newest follower too. I hope you come to visit and become a follower of mine. I am Linda, who helps Liz, Diane and others with their blogs. Merry Christmas...
ReplyDeleteI have often wondered if they really "cracked" and made a noise. Not a last minute idea as I will have to save TP rolls this year for next but what a fun idea. Thanks.
ReplyDelete~ ~Ahrisha~ ~
Yes Ahrisha, they do bang some louder than others. As a child, in fact as an adult I would have one hand on the cracker pulling with a friend and one over my ears! I don't use the bangers in mine.
ReplyDeleteI realise it was not a last minute type of tutorial but thinking that people could make at least one for a hostess gift and fill it with chocolates. I do collect up the TP rolls throughout the year. You will have to try next year. Next year I will post earlier and have several different styles including a shabby chic idea I have.
Lee
These are beautiful crackers Lee! I will have to give them a try next Christmas! I hope the Christmas cake baking went well :) x Kirsty
ReplyDeleteHi Lee, thanks for stopping by my blog, Cush & Nooks. I love finding other NZ bloggers, and have just become your latest follower. Such a great idea to make your own crackers, and yours looks so much more beautiful than a lot of the shop ones, and more special as you made them yourself. Am going to give them a go. xxx
ReplyDeletePS: what a cutie Poppy is (I'm a big dog lover)
These are so elegant!!
ReplyDeleteMerry Christmas!
Gosh a year has gone and I missed your comment Holly, so sorry, thank you.
Delete