
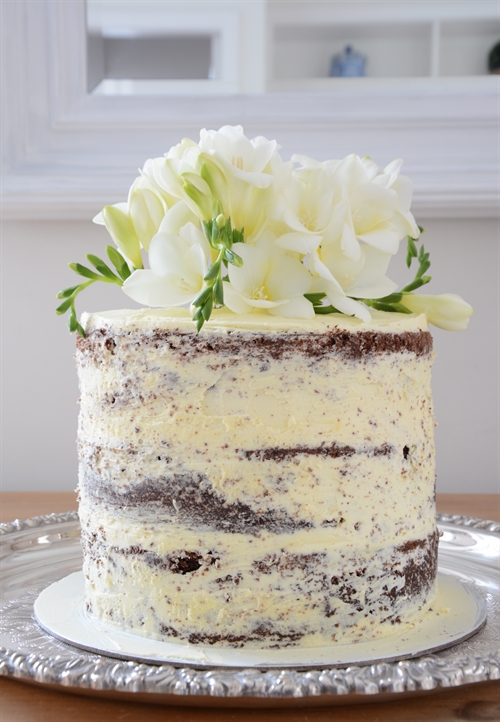
Hi everyone, recently I mentioned that I was attempting a cake for my son's wedding, last week I made a trial, naked cake and thought I would share the recipe, some images of my cake and a few great video instructions I discovered.
I have to admit, I am no pastry chef and I knew it was going to be a bit "hit and miss" but for a first attempt I was really pleased. Thankfully I have a reprieve as my sons partner's boss, is a pastry chef and she is now going to make the wedding cake as a present for them. My recipe is simple and although the cake might look impressive using my foolproof chocolate cake recipe you can't go wrong.

Naked Wedding Cake Instructions:
- You will find my chocolate cake recipe below:
Ingredients:
- 1 cup caster sugar (extra fine granulated)
- 2 eggs
- 1 cup of plain yogurt or milk (I like to use half and half as all yogurt makes the cake a little heavy)
- 3/4 cup cocoa
- 200gms soft butter
- 2 teaspoons baking soda
- 1 and a half teaspoons vanilla essence
- 1/4 teaspoon of salt
- 3 cups self raising flour
- 1 cup coffee (strong)
- 8" or 20cm diameter cake tin with deep sides (spring bottom is best to be able to get the cake out easily after)
Method:
- Place all the above ingredients into a food processor or large bowl and mix well
- Turn into a loose bottom cake tin which is pre greased and lined with baking paper so that it extends about 3" above the pan
- Bake for 1 hour and 15 mins at 160 degrees Celsius (320 Fahrenheit) (check with cake skewer in the centre after one hour then again at 1 hour 10 mins to make sure skewer comes out clean, cooking time can depend on your ovens temperature)
- Turn off the oven when cooked and allow to cool inside the oven
- Allow to stand until fully cooled before removing from cake tin
For the Naked cake:
- You will need to make 3 eight inch cakes. This means making the chocolate cake recipe with three times the ingredients and pouring into three 8" cake tins, you could use 10" tins as this recipe does rise up high but it may take a little less time to cook in a 10" pan so you would need to keep an eye on it
- I cooked two at once then baked the third one alone
- Once the cakes are cooked, allow the cake to cool fully before you remove from the tin. I use the spring form tins that you can unclasp the sides as it is much easier to remove
- You then need to make your butter icing, basically I used a method of one part butter to two parts Icing sugar (powdered sugar). Allow your butter to soften at room temperature and beat for 5 mins until light and fluffy. Then add your icing sugar one cup at a time beating slowly in between, you will need to turn down your beater so the powder doesn't fly everywhere. Give it a final high beat for a few minutes once all the icing sugar has been added. If it is too thick you can adjust by adding a teaspoon of milk and beating and another one if still too thick. It should be thick enough to stick to a spoon upside down but shake off the spoon if you shake really hard. Once it is made you can add a few drops of flavouring and quickly mix again. I used orange essence as I thought orange icing and chocolate cake would be a nice combination
- You then need to slice your cooled cakes. Just slice off the crown of the cake so that they are all level and equal in height
- I used a cake slicer, (see this great video below from Wilton on levelling your cake for layering). If you don't have a slicer, Wilton also show you how to do it with a knife
- Once you have your three cake slices and your butter cream made, put a dollop of butter cream onto an 8"cake board and place your cake on top, press down firmly with a flat hand, this will keep your cake stuck to the board
- Place four plastic straws or dowels into the cake to support the next layer. These should be cut off at the level of the cake
- Using a spatula or piping bag, pipe or spread on your first layer of butter cream
- Then add your next cake layer, using one straw in the centre pierce down to the bottom of the cake layer beneath, this will hold the cake in place. If you are moving the cake to a venue you will need to place three straws or dowels between each layer and an 8" board in between each layer (remember to apply a little butter cream in the centre of your board first so the cake will stick to it
- Spread your second layer of butter cream onto your second layer of cake and put your straws or dowels in place then add your final cake layer (to do this properly you would have another board on the base of your final layer). You can sprinkle a 4" diameter of fine coconut in the centre of your cake layer below before placing your next layer. This will enable the layers to be easily separated without pulling all the butter cream away from the layer below
- Once you place the final layer, cover the cake with a thick layer of butter cream and using a spatula or large flat cake scraper smooth the surface. There are some great instructions in this video below on how to ice your cake...
Top Tip:
Use plenty of buttercream in between your layers, don't be stingy with it. Better still use chocolate ganache filling in between and buttercream on the outside.
I allowed a more rustic look to my cake by letting the chocolate cake crumbs show through, however to get this look you can do your first layer of thin butter cream, then place your cake in the fridge for 20 mins then remove it and do another layer of icing to hide the crumbs beneath. Obviously a chocolate cake will show the crumbs more than a light coloured cake
Your Cake Topper:
- Form a dome shape with white fondant icing, you can buy ready made in the supermarket
- Fresh flowers or fruits are the simplest method of decorating, Roses work great, I used Freesia's on my cake which look very pretty and have a wonderful scent
- Place your flowers however you want to arrange them into the icing and then use some butter icing to glue it to the top of your cake and voila!

Impress your friends with this simple cake. If I made it again I would slice each layer yet again to make it a 6 layer cake and put lots more butter icing in between. Naked cakes are much the in thing and you can fill them or decorate them with anything. At a blog called 'A Tea with the Queen' I spotted a recipe for mascarpone cream filling which blogger, Sarah used in her naked cake. I encourage you to visit Sarah's blog as she is very talented.
For more cake ideas and links to recipes, please visit my Pinterest Board
Bon Appetit

Sharing this post with some of the following blogs:
Not Just A Housewife|No Minimalist Here|The Real Housewives of Riverton|My Romantic Home|Natasha in Oz|The 36th Avenue|Miss Mustard Seed
Looks fabulous Lee - I've yet to try making a naked cake. I love the look - very minimalist!
ReplyDeleteThanks Susan, I am sure you would make a fabulous cake, I am ok at the decorating but not so good at baking and actually only ever use my chocolate cake recipe as it works out. I need to try it without the cocoa and see if I can make the recipe a different flavour but it would mean playing with the flour as it takes 3/4 cup cocoa which I guess means I would need more flour if I was leaving it out.
DeleteDo you have an idea of how long will the flowers last? Can I put them the night before??
ReplyDeleteHi Carol,
DeleteI bought the flowers the day before and kept them in water until I put them in the cake. To put them on the cake I actually gathered the bunch of flowers cut to the length I wanted them and wrapped the stem in wet cotton wool wrapped around then I wrapped tin foil (aluminium foil) tightly around the stems so that they were not bulky and pushed this into the cake. They should last at least a day in the cake if not out in the hot sun. You could also wire the stems like a florist does with florist wire and poke them into the cake but best to have the stems all in the centre. If you are using the cotton wool and tinfoil wrap you could possibly put them in the cake the night before but I would recommend leaving them in a glass of water until the day you need them.
Hope this is helpful :)
Thanks! You really help me!! My cake was beautiful..
DeleteSo glad this blog post helped you to create a lovely naked cake :)
DeleteFor both of you who desire to have a naked cake you can meet half way like this semi naked cake and finishing touch with Marsala coloured blooms and gold dusted blackberries as wedding cake
ReplyDelete